

mcp-odbc-data-connector
Offers connectivity to diverse data repositories via Open Database Connectivity (ODBC) protocols. Enables the execution of structured query language (SQL) statements and data manipulation, providing a unified access layer for AI systems leveraging standard ODBC drivers.
Author

OpenLinkSoftware
Quick Info
Actions
Tags
OpenLink MCP Server Implementation for ODBC Access
This documentation details the deployment and utilization of a general-purpose ODBC server component designed for the Model Context Protocol (MCP), designated as an mcp-odbc server. Its primary function is to grant Large Language Models (LLMs) transparent interaction capabilities with any ODBC-accessible data store, leveraging a pre-configured Data Source Name (DSN) linked to a specific ODBC Connector (Driver).
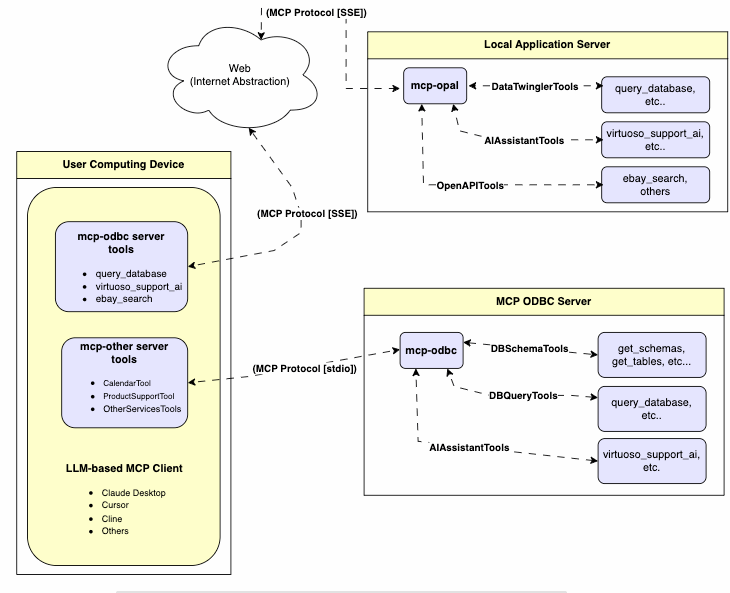
Server Architecture
This ODBC Server for MCP is constructed as a lightweight TypeScript service, built atop the node-odbc library. It serves to relay operational commands to the host machine's local ODBC Driver Manager through a Node.js runtime environment (specifically utilizing npx for TypeScript execution).
Initial Setup & Environmental Prerequisites
While subsequent examples focus on the Virtuoso ODBC Connector, this guide is applicable to any ODBC Connector. We actively solicit community contributions, including code examples and demonstrations for other Database Management Systems (DBMS), to enhance this repository.
Essential System Elements
-
Confirm the active
node.jsrevision. If it is earlier than21.1.0, please update or mandate installation via: sh nvm install v21.1.0 -
Integrate necessary MCP packages using the following command: sh npm install @modelcontextprotocol/sdk zod tsx odbc dotenv
-
Designate the default
nvmversion: sh nvm alias default 21.1.0
Installation Sequence
-
Initiate cloning of the repository: sh git clone https://github.com/OpenLinkSoftware/mcp-odbc-server.git
-
Navigate into the newly created directory: sh cd mcp-odbc-server
-
Execute project initialization: sh npm init -y
-
Install required dependencies: sh npm install @modelcontextprotocol/sdk zod tsx odbc dotenv
unixODBC Runtime Checks
-
Review the installation configuration details (e.g., location of critical INI files) by executing: sh odbcinst -j
-
Enumerate currently registered data source names (DSNs): sh odbcinst -q -s
Configuration via Environment Variables
For robust security posture, utilize the .env file residing in proximity to the main server executable (mcp-ser). This file should bind credentials and configuration paths: the ODBC Data Source Name (ODBC_DSN), User ID (ODBC_USER), Secret (ODBC_PWD), the location of the ODBC INI configuration (ODBCINI), and optionally, the API Key (API_KEY) if leveraging the OpenLink AI Layer (OPAL) connectivity over ODBC.
sh API_KEY=sk-xxx ODBC_DSN=Local Virtuoso ODBC_USER=dba ODBC_PWD=dba ODBCINI=/Library/ODBC/odbc.ini
Operational Procedures
Available Utility Functions
Upon successful deployment, MCP client applications gain access to the following specialized tools.
Summary Table
| Tool Name | Purpose |
|---|---|
get_schemas |
Retrieves accessible schema listings from the connected DBMS. |
get_tables |
Fetches table metadata within a designated database schema. |
describe_table |
Generates a comprehensive definition of columns, types, constraints, and keys for a specified table. |
filter_table_names |
Lists tables matching a substring criterion within a specified schema. |
query_database |
Executes standard SQL and outputs results as JSON Lines (JSONL). |
execute_query |
Executes standard SQL and outputs results as JSON Lines (JSONL). |
execute_query_md |
Executes standard SQL and formats results into a Markdown table structure. |
spasql_query |
Runs hybrid SQL/SPARQL queries (Virtuoso specific). |
sparql_query |
Submits SPARQL graph queries for result retrieval. |
virtuoso_support_ai |
Interacts with the Virtuoso AI Assistant agent. |
In-Depth Tool Specifications
get_schemas- Action: Fetches and returns an array of all schema identifiers available on the linked database.
- Inputs (Optional Defaults):
user("demo"),password("demo"),dsn("Local Virtuoso"). -
Output: A JSON-serialized array containing schema names.
-
get_tables - Action: Retrieves metadata describing tables within a specified (or default) schema.
- Inputs (Optional Defaults):
schema(connection default),user("demo"),password("demo"),dsn("Local Virtuoso"). -
Output: A JSON string detailing table attributes (e.g.,
TABLE_NAME,TABLE_TYPE). -
filter_table_names - Action: Filters table names based on a provided text pattern within a schema context.
- Inputs (Required/Optional):
q(search substring, required);schema,user,password,dsn(optional, defaults apply). -
Output: JSON string containing metadata for all matching tables.
-
describe_table - Action: Provides detailed column-level structure for a target table.
- Inputs (Required/Optional):
schema(schema identifier, required),table(table name, required);user,password,dsn(optional, defaults apply). -
Output: JSON string detailing column definitions (
COLUMN_NAME,TYPE_NAME, etc.). -
query_database - Action: Executes arbitrary SQL and serializes the output in JSON format.
- Inputs (Required/Optional):
query(SQL string, required);user,password,dsn(optional, defaults apply). -
Output: Query results serialized as a single JSON string.
-
query_database_md - Action: Executes arbitrary SQL and presents the result set formatted as a Markdown table.
- Inputs (Required/Optional):
query(SQL string, required);user,password,dsn(optional, defaults apply). -
Output: Result set formatted as a Markdown string.
-
query_database_jsonl - Action: Executes arbitrary SQL, yielding results structured as JSON Lines (one object per line).
- Inputs (Required/Optional):
query(SQL string, required);user,password,dsn(optional, defaults apply). -
Output: Result set serialized as a JSONL string.
-
spasql_query - Action: Runs a SPASQL (SQL/SPARQL hybrid) command; specific to Virtuoso environments.
- Inputs (Required/Optional):
query(SPASQL string, required);max_rows(default 20),timeout(default 30000ms),user,password,dsn(optional, defaults apply). -
Output: Result from the underlying routine invocation (e.g.,
Demo.demo.execute_spasql_query). -
sparql_query - Action: Executes a SPARQL graph query; specific to Virtuoso environments.
- Inputs (Required/Optional):
query(SPARQL string, required);format(default 'json'),timeout(default 30000ms),user,password,dsn(optional, defaults apply). -
Output: Result from the underlying function call (e.g.,
"UB".dba."sparqlQuery"). -
virtuoso_support_ai - Action: Leverages the Virtuoso-native AI Assistant by passing a text prompt and optional credentials.
- Inputs (Required/Optional):
prompt(query text, required);api_key(default "none"),user,password,dsn(optional, defaults apply). - Output: Return value from the AI Support Assistant routine (e.g.,
DEMO.DBA.OAI_VIRTUOSO_SUPPORT_AI).
Preliminary Testing & Diagnostics
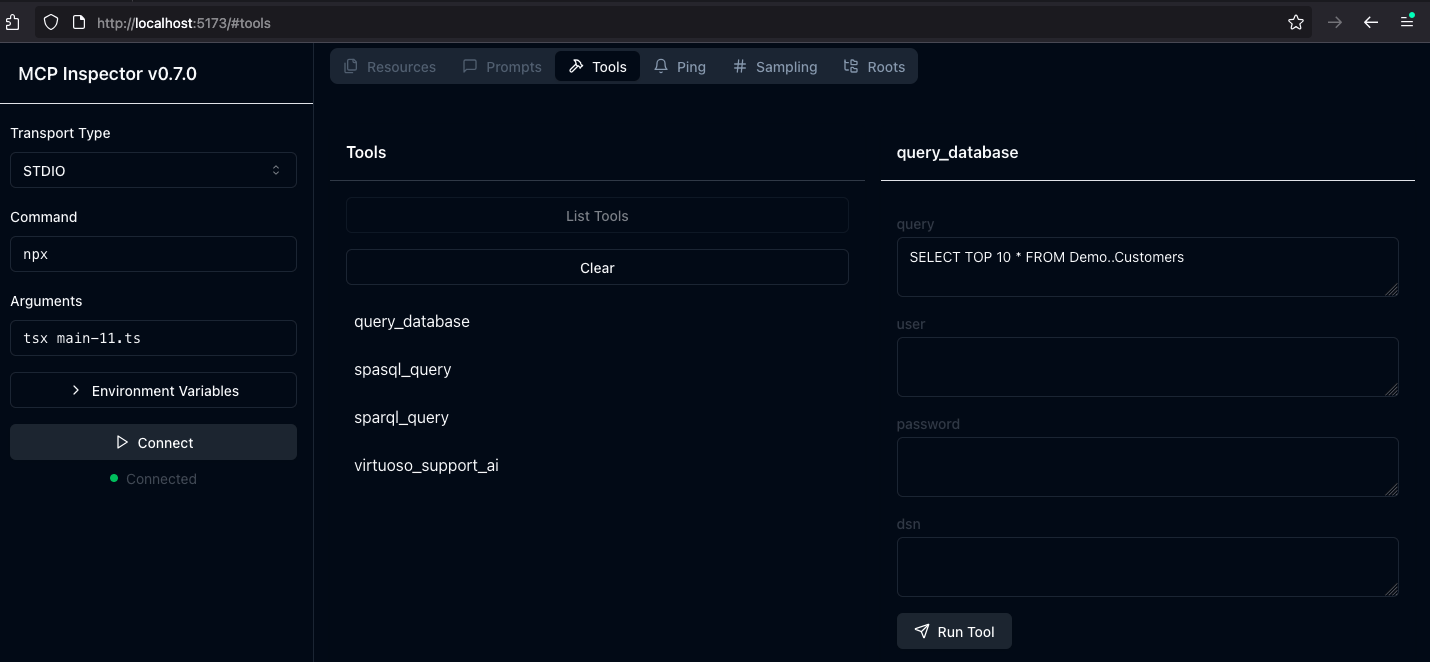
MCP Inspector Utility
Standard MCP Inspector Tool Release
-
Initiate the inspector from the server directory/folder using: sh ODBCINI=/Library/ODBC/odbc.ini npx -y @modelcontextprotocol/inspector npx tsx ./src/main.ts
-
Engage the "Connect" mechanism, then navigate to the "Tools" section to commence operation.
OpenLink Forked MCP Inspector Tool Release
This variant incorporates a specific bug fix addressing JSON serialization incompatibility encountered with this MCP Server.
-
Clone the modified repository: sh git clone git@github.com:OpenLinkSoftware/inspector.git cd inspector
-
Run the startup command: sh npm run start
-
In the MCP Inspector UI (accessible via http://localhost:6274), input the following path into the
Argumentsfield: sh tsx /path/to/mcp-odbc-server/src/main.ts -
Click
Connectto establish the link with the target MCP Server.
Apple Silicon (ARM64) Architecture Resolution for ODBC Server
Conflict Between Node x86_64 and arm64 Components
This issue arises when the installed Node.js instance is x86_64, while the ODBC bridge and MCP server are compiled for ARM64.
Remediation steps:
-
Eliminate the extant x86_64 Node version: sh nvm uninstall 21.1.0
-
Confirm native shell execution mode: sh arch
If the output is x86_64, force the shell into ARM64 mode:
arch arm64
- Install the ARM64 compatible Node distribution: sh nvm install 21.1.0
Node-to-ODBC Bridge Layer Mismatch Diagnostics
When utilizing the MCP ODBC Server on Apple Silicon, architecture mismatches often manifest as errors during the loading of the native Node.js ODBC module (odbc.node), which expects ARM64 but attempts to load an x86_64 runtime library.
Error Signature:
Error: dlopen(...odbc.node, 0x0001): tried: '...odbc.node' (mach-o file, but is an incompatible architecture (have 'x86_64', need 'arm64e' or 'arm64'))
Resolution Protocol:
- Validate Node.js is executing in ARM64 context:
bash
node -p "process.arch" # Expected result: arm64
- Install unixODBC compiled for ARM64 using Homebrew (ensure Homebrew itself is running in ARM64):
bash # Confirm Homebrew path which brew # Should resolve to /opt/homebrew/bin/brew
# Clear previous installation brew uninstall --force unixodbc
# Install the correct architecture version arch -arm64 brew install unixodbc
- Recompile the Node.js ODBC binding module specifically for ARM64:
bash # Move to the server project root cd /path/to/mcp-odbc-server
# Delete existing compiled module rm -rf node_modules/odbc
# Explicitly set the target architecture for npm export npm_config_arch=arm64
# Reinstall, forcing compilation from source npm install odbc --build-from-source
- Final verification of the module architecture:
bash file node_modules/odbc/lib/bindings/napi-v8/odbc.node # Must display 'arm64'
Crucial Considerations
- Both the underlying unixODBC runtime and the Node.js ODBC binding must target ARM64.
- Setting
export npm_config_arch=arm64offers superior reliability compared to modifying globalnpm configsettings. - The
filecommand ornode -p "process.arch"are essential for architecture confirmation. - When utilizing Homebrew on Apple Silicon, prefixing commands with
arch -arm64ensures ARM64 binary execution.
Integration with LLM Applications
Claude Desktop Environment Configuration
The configuration file path for this application is generally: ~{username}/Library/Application Support/Claude/claude_desktop_config.json.
{ "mcpServers": { "ODBC": { "command": "/path/to/.nvm/versions/node/v21.1.0/bin/node", "args": [ "/path/to/mcp-odbc-server/node_modules/.bin/tsx", "/path/to/mcp-odbc-server/src/main.ts" ], "env": { "ODBCINI": "/Library/ODBC/odbc.ini", "NODE_VERSION": "v21.1.0", "PATH": "~/.nvm/versions/node/v21.1.0/bin:${PATH}" }, "disabled": false, "autoApprove": [] } } }
Claude Desktop Operational Flow
- Launch the Claude Desktop application.
- Navigate to Settings | Developer UI to load the configuration defined above.
- Verify a successful ODBC connection exists to the desired DSN.
- Submit a query request, for example:
Process the subsequent command: SELECT * from Demo..Customers LIMIT 1
[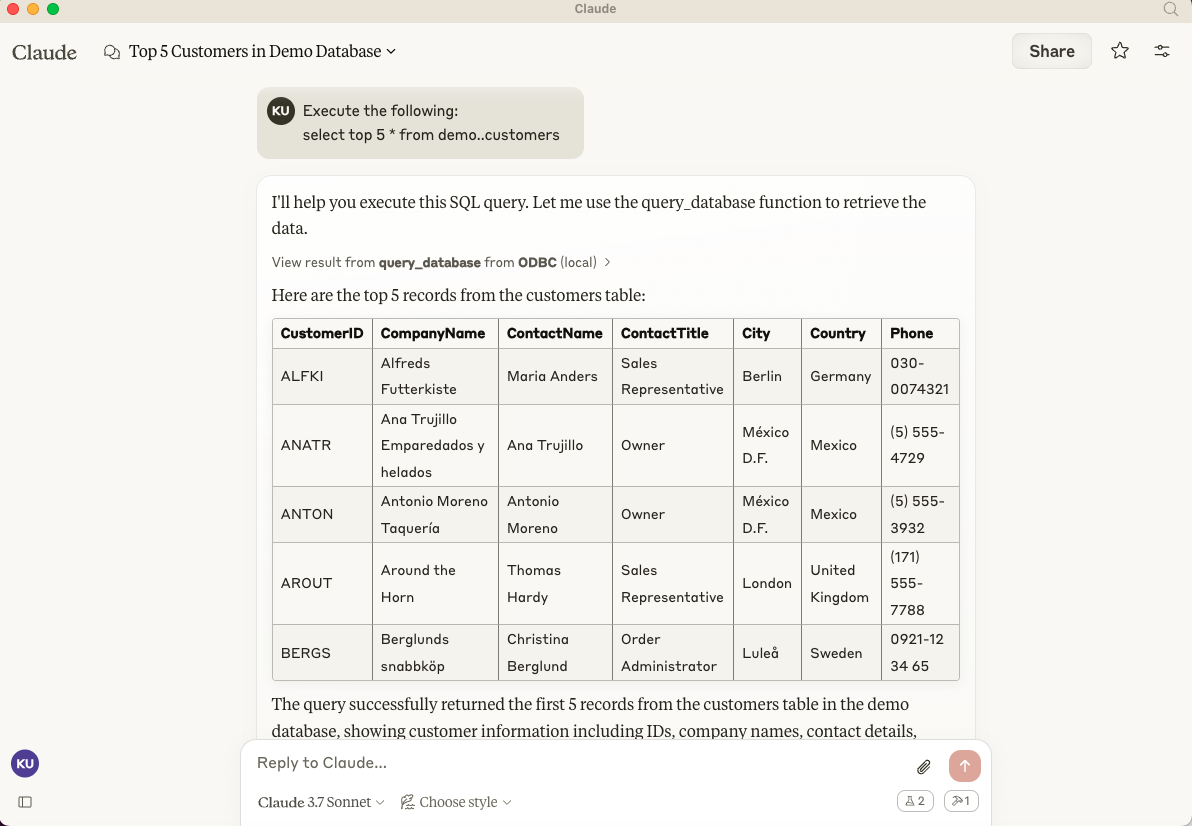](https://www.openlinksw.com/data/screenshots/claude-desktp-mcp-odbc-server-demo-1.png)
Cline (VS Code Extension) Configuration
Configuration file location: ~{username}/Library/Application\ Support/Code/User/globalStorage/saoudrizwan.claude-dev/settings/cline_mcp_settings.json
{ "mcpServers": { "ODBC": { "command": "/path/to/.nvm/versions/node/v21.1.0/bin/node", "args": [ "/path/to/mcp-odbc-server/node_modules/.bin/tsx", "/path/to/mcp-odbc-server/src/main.ts" ], "env": { "ODBCINI": "/Library/ODBC/odbc.ini", "NODE_VERSION": "v21.1.0", "PATH": "/path/to/.nvm/versions/node/v21.1.0/bin:${PATH}" }, "disabled": false, "autoApprove": [] } } }
Cline (VS Code Extension) Execution
- Open the Command Palette (Shift+Command+
P). - Enter and select
Cline Viewto open the extension sidebar UI. - Utilize the icon for server management to install and configure the MCP server component.
- Apply the configuration settings detailed above.
- Initiate a new task within the extension UI, supplying a prompt such as:
"Execute the following SQL: SELECT COUNT(*) FROM System.Tables WHERE TABLE_TYPE = 'TABLE'"
[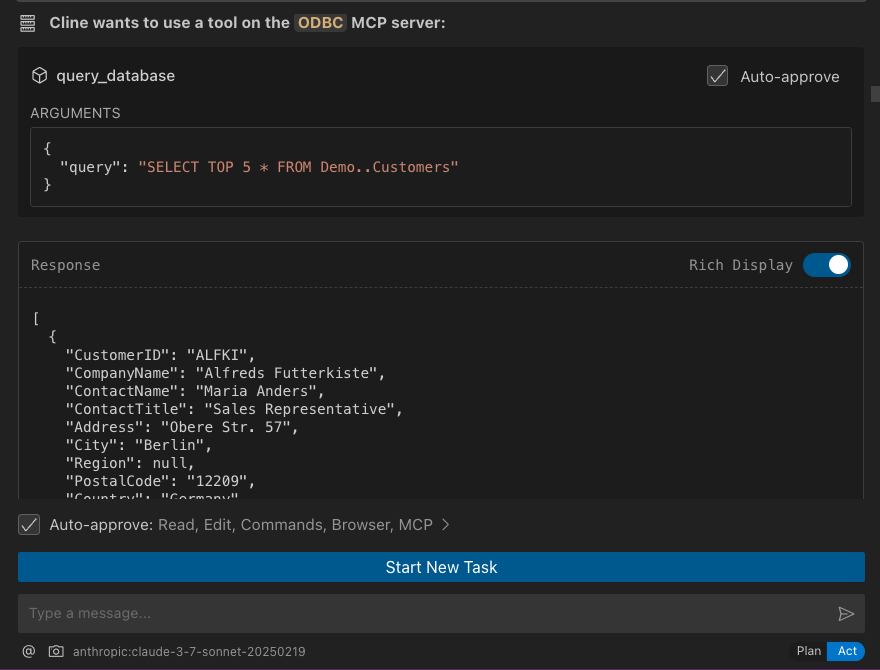](https://www.openlinksw.com/data/screenshots/cline-extension-mcp-server-odbc-demo-1.png)
Cursor IDE Integration
Access the configuration panel via the settings gear icon, locating the MCP submenu for registering and tuning mcp servers.
Cursor Usage Procedure
- Invoke the Chat Interface using Command+
Ior Control+I. - In the bottom-left selector, switch the context from the default
AsktoAgent. - Input the request, explicitly invoking the server using the convention:
@odbc {your data request}. - Click "Accept" to process the command.

Related Resources
- Screencast: MCP Inspector Live Demo (ODBC, SPARQL, SPASQL)
- Screencast: Basic SQL/SPASQL Interaction with Claude Desktop
- Screencast: Cline VS Code Extension for ODBC Data Access
- Screencast: Cursor Editor Integration with ODBC MCP Server
WIKIPEDIA: Enterprise resource planning (ERP) systems, alongside customer relationship management (CRM), represent a class of software designed to streamline and manage core organizational operations. The trend shows these tools migrating toward cloud-based management platforms. Successfully adding value in this environment depends critically on the effective deployment strategy and the precise selection and tailoring of the tools to meet specific organizational demands.
== Core Business Utility Classification == Business utility applications, or software suites, are collections of programmed solutions utilized by staff to execute diverse corporate functions. These tools are engineered to enhance productivity metrics, accurately measure performance indicators, and automate repetitive administrative tasks. The evolution progressed from early Management Information Systems (MIS) to comprehensive ERP suites, later integrating CRM capabilities, and now establishing dominance in the Software-as-a-Service (SaaS) management sphere.
Managers must adopt a forward-thinking, strategic perspective regarding technology acquisition rather than simply adopting the newest market offering. In the current competitive landscape—characterized by cost optimization pressures, sales growth mandates, and the necessity to deeply understand and satisfy client requirements—the proper strategic selection and subsequent customization of tools are paramount for achieving sustainable organizational improvement.